HM-133/151 DTMF Microphone Project Page

Updated 03/02/2024

(Back to the Projects page...)
!! New: A Bluetooth add-on for the ICOM IC-901A !!

This page provides support information for the HM-133 DTMF Adapter Project

This is a small adapter that allows the HM-133 (or HM-151) to act as a general purpose, DTMF microphone.

A small microcontroller is used to capture digital information from the HM-133 and convert the keypresses into DTMF tones. In addition, function buttons are implemented to allow accessory buttons on some radios to be supported. A status LED (that can be located in the microphone, if desired) indicates when keypresses are detected and stays off while the mic audio is muted for tone generation or tone guard time. The brightness of the LED is adjustable using the HM-133 keypad to allow comfortable operation day or night. Lastly, a "macro mode" allows the up or down buttons to be pulsed up to 99 times to facilitate long frequency moves, or known steps through memories.

The project can be built from scratch, but PCBs and partial kits will likely be available. The partial kits feature all of the top SMD parts soldered including a programmed microcontroller. The remaining parts are provided and are installed by the kit builder. Fully assembled units are not likely to be available. Adapter cables that join the adapter to the radio must be provided by the builder. These cables use standard components, however, which can be easily obtained from several sources.

While software skills and tools are not required, the Software link below provides instructions to obtain the source code for this project. Links to the tools needed to compile and program the SiLabs C8051F530 microcontroller used for this project are provided below.

"Of Mics and Men": A brief synopsys.

"The Meat": Detailed hardware design

"The Potatoes": Detailed software design

"Fine Dinning in the Cafeterium": Kit ordering and assembly

"ICOM in pieces (take me to your Leader)": HM-133/151 Modifications


A Brief Synopsis...

This project was born of a measure of desire and serendipity. I have an ICOM IC-7000 which uses an HM-151 microphone. As capable as the radio is, it cannot easlily generate DTMF signaling with the HM-151 (one must program DTMF "memories" to send DTMF tones, which involves several steps). This seems like a significant oversight for a radio that can operate on FM repeater frequencies in the VHF/UHF spectrum. Such is the desire.

The serendipity came from a recent acquaintance that shares my affinity for the ICOM IC-901. He had a problem locating a DTMF mic for his radio, which got me to thinking, “If I needed a DTMF microphone, what options might I have?” While there are some new models out there, they seemed to be a bit difficult to find with ease. Having several ICOM HM-133 and HM-151 microphones lying around, it seemed like an interesting project to see if they could be adapted to create DTMF signals.

A few years ago, I was interested in decoding my HM-151 key-data output for other reasons, and I was aided in this task by the efforts of K4JCW with regard to the HM-133 (which is very similar to the HM-151), which he posted in a very helpful manner on his tinymicros wiki page. This led me to write a decoder application for an ARM-based radio controller I have been working on for some time, so the code for this was a done deal, so to speak. DDS (Direct Digital Synthesis) tone generation is something I’ve been doing for decades, so this was also an easy task. I chose a small 8051 MCU that I’ve used in the past and designed the necessary circuits to capture the HM data, merge the DTMF signals with the microphone audio, and squeeze it all into as small an area as practical.

This web page details the hardware and software design for this project, and serves as a repository for detailed information relating to its construction and use.


Hardware Design...

The C8051F530 is an MCU I’ve used on several other projects, so it was near the top of my short list. Turns out, it was a really short list. I only needed some timer resources and some way to implement a DAC, and all of these features are capable on the F530. In addition, it has a comparator peripheral which eliminated the need for an extra part. The comparator is needed to capture the serial data from the microphone. The serial data is rather odd in that it features a mark at about 3V and a space at about 1.8V. The comparator helps “limit” the signal so that the edges can be detected by the MCU GPIO pin logic. The comparator output is then fed to a timer pin which is used to capture the bit edges for decoding in software.

The F530 doesn’t have a DAC, but it can do PWM which is a good 2nd choice. A pair of timers are used to generate a PWM digital to analog converter and drive the DDS interrupt. The PWM rate is set high, 24KHz, to ease the PWM filter requirements. The PWM signal is filtered with a pair of RC low-pass networks (using R33/C15 and R19/C16), then fed to a 1K pot for level adjustment. A single-device analog switch is used to connect the resulting signal to the MIC signal of the target radio. This SPDT switch has its common connection at the rig and selects either MIC or TONE at the control of the MCU.

If only UP/DOWN buttons were needed, the MCU would have enough GPIO to drive them, but many microphones feature “function” buttons which connect a particular resistance value from the up or down rig signal to GND. This is a simple method of multiplexing the function selections through just two (or one) connection to the rig. Since the F530 is out of pins, a CD4094 shift register was used as a port expander to drive the PTT, up, down, and function selections. Each CD4049 output is mapped as a function to FET transistors that act as low Rds(on) buffers for the series resistors that are installed per the target radio/microphone. For example, most of the (older) ICOM radios use 0 Ω for UP and 470 Ω for DOWN. Other resistor combinations are described in the schematic notes.

A second analog switch is used to gate the microphone data (MDATA) signal to the radio. This is primarily targeted at the IC-7000 but can be applied to any radio that uses the HM-151. This allows a means by which the DTMF keys may be pressed without sending potentially confusing data to the radio. Q6B and R31 set the termination resistance for the MDATA signal when there is no target radio to provide this required termination. This is either in the case of a generic radio interface, or for the IC-7000 when the adapter is configured to generate tones.

A status LED is provided which is driven by a dedicated PWM output from the MCU. By using a PWM to drive the LED, its brightness can be easily controlled. Software option straps are provided to allow up to 8 different operating modes (DMUTE and MMUTE outputs are multiplexed as inputs on reset to read the state of two of the strap bits). The reminder of the design is rounded out with a 5V LDO voltage regulator, EMI ferrite beads, and some components to support in-circuit programming of the MCU.

HM-133 DTMF Adapter Schematic and Parts List

(click on image to see a pdf version)


Software Design...

The software operates in a single loop which polls for serial data from the mic and parses it into actions (either tones or GPIO pulses). 
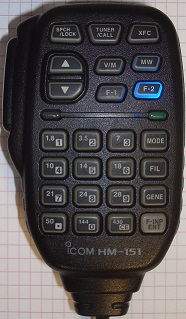
It depends heavily on interrupts to allow a simple polling loop, real-time control system. The software supports UP, DOWN, and 4 “function” buttons as well as the standard 4x4 DTMF key layout. A 1KHz tone function is also provided. The status LED blinks when a key is pressed and is turned off when the microphone is muted.

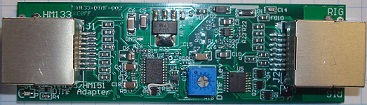
There are three timer interrupts, and one Programmable Counter/timer Array (PCA) interrupt. The timer interrupts are all configured in a similar manner with timer 0 providing part of the bit-bang SPI function, timer 1 handles the code to process the DDS tone generator, and timer 2 provides a series of count-down-from-N-and-halt application timers. The PCA captures MDATA edges and parses them into a 32-bit result which contains information on mode and key-ID.

Timers 0 and 2 are not particularly engaging, they perform a simple task, in a simple manner. Timer 1 is a little more interesting but is still relatively straightforward. It implements a simple, 2-tone DDS generator that is phase-accumulator based (see NXP's AN1771 for a detailed treatise on the subject). For the DAC, one of the PCA PWMs is used, but not as an interrupt. The idea is that since timer 1 and the PCA run off of the same clock base, they will remain synchronized. This allows the DDS algorithm to write updates to the PWM without worrying about pop-noise that can occur if the update isn’t precisely aligned to the DDS sample clock.

The PCA interrupt is the most complicated ISR in this project. It captures timing edges and then parses them into 1’s or 0’s which are shifted into the result register. The ICOM protocol uses a sync header to signify the start of a frame. For simplicity, the bit timing is hard-coded. A better solution would be to use the sync frame to establish the timing reference and calculate the bit gates from the sync timing. While three microphones is not a fair sample, I am 3 for 3 at present, so dynamic sync frame timing is penciled-in for a future embellishment.

A three-deep buffer is used to communicate the captured MDATA register up to the application level. This is a vestige of the original ARM application which featured a much deeper buffer. Three keys is likely overkill, but takes just a little memory and provides some leeway for unforeseen key-press scenarios.

The main application initializes the GPIO and peripherals, and then enters the main process loop (MPL). Actually, there are two nested loops in main(). The outer loop holds the initialization code, which is followed by the MPL. This allows the MPL to break out and essentially restart the main() function, facilitating a software reset. This is performed whenever the microphone detect signal indicates that the microphone has been removed. The most important artifact of this is that the PTT will be reset preventing the radio from being inadvertently locked into the TX state with the microphone no longer present.

Since this is a real-time system, it is important to limit how much time a particular operation can take. The judicious use of interrupts has off-loaded much of the low-level operations. The MPL must take the various inputs and act upon them. Some use of local timing loops is employed, but only where the time value is an isolated and short one, or there is some other means for breaking out of the timing operation. Since the application is relatively straightforward, the use of an RTOS was not viewed as an efficient option for such a small (8K) MCU.

The code is a bit complicated in the MPL. This is largely due to the fact that the system must accommodate two sources of PTT (a logic input, in the case of the HM-151, and an MDATA message in the case of the HM-133) and also the behavior of the HM-133 when sending DTMF key codes. Oh, and the up to 8 different operating modes. Getting the HM-133 DTMF-S mode to work with the HM-151 hard-wired PTT was a bit of a challenge. In addition, the microphone mute needed to be “sticky”, with a timer to cancel the mute after the appropriate span of time had elapsed from the last key release.

The logic PTT and microphone detect are processed at the top layer of the MPL. If a keypress is detected (as signaled by a new keycode being present in the input buffer), the second layer is entered. This is where the key is processed. All of the keys on the HM-133/151 microphones repeat except for the HM-133 PTT. This fact is employed in the software to detect when a key has been released.

For the purposes of this application, the keys on the microphone are grouped into two categories: DTMF keys, and function keys. The DTMF keys have multiple functions, depending on the state of the system. If the PTT is active, a DTMF key will issue the appropriate tone. If PTT is inactive, numeric digits are entered into an “accumulator” that can accommodate two digits that represent 99 or less. “*” or “#” set the status LED to be bright or dim. “*”, “#”, or the 4th DTMF row all clear the accumulator.

In the case of the HM-133, the microphone must be in “DTMF-S” mode to generate DTMF tones. In this case, PTT is not needed. The software detects the key and issues the tone. When finished, PTT is released, even if it is still pressed. Unfortunately, this is how the HM-133 works, to the best I can tell, so I haven’t found any way to improve upon the behavior. This isn’t an issue with the HM-151.

The accumulator is used when the UP or DOWN buttons are pressed. The system will pulse the appropriate logic output by the number of times defined in the accumulator (if the accumulator is “0”, 1 pulse occurs).

The object code for the adapter is available here. The "SiLabs Programming guide" describes the steps and items needed to program the project MCU. The source code page describes where and how to access the source repo.


The Kit...

With the exception of the radio microphone connector, all of the components for this project can be ordered from www.mouser.com or the electronic retailer of your choice. An e-mail to me is the current means by which to order PCBs (see the pdf documents referenced on this page for the e-mail address). Gerber files are provided, so you may order your own set from your favorite PCB FAB. A programming adapter for the SiLabs chips ($35 from Mouser, et.al.) is needed as well as an adapter cable that must be fabricated by the builder. The programming adapter cable converts the 10-pin dual row programming cable to the 6-pin, small form-factor connector used on the DTMF Adapter to save space (instructions on constructing are found in the "SiLabs Programming guide").

The DTMF adapter features a number of fine-pitch ICs and transistors along with several 0402 (and larger) chip-parts, so if you have never soldered SMD parts this small, or have difficulty doing so, this is not a good option. A partial-kit is an option that I have pursued with reasonable success for my Orion PLL and will likely give this a try for this project. The goal is to partially assemble the modules (top SMD parts only) offshore. The parts that remain would be bottom side SMD parts (all 0603 or larger), and top-side thru-hole parts. This makes it reasonable to complete the assembly for most folks who know how to solder, while keeping the assembly costs at a minimum.

This approach requires a certain level of interest before I can commit to paying (up-front, no less) for the assembly of a number of units. As of this writing, about 15 or so pieces is the expected threshold. Once enough interest develops, it could take as long as 6 weeks to receive all of the materials from which to assemble the kits and get them shipped. This isn’t intended to be a business operation, so please don’t anticipate the response times you might expect when dealing with a for-profit enterprise.

For the moment, I can only promise that PCBs should be available along with the data on this page, which includes an "Assembly and Operations Manual".


HM-133/151 Modifications...

I am not particularly “over the moon” for the HM-133/151, but I have figured it out (mostly) and that figures prominently in my choices. If I KNOW a thing, I can mitigate its faults and make it be useful. In this case, it allows for a feature-rich command keyboard that fits in the palm of your hand. It also converts speech to an electrical signal, so you kill two birds with one stone.

Now, the faults. The audio of the HM-133 leaves something to be desired. Mostly, due to its variability. I have two HM-133 microphones, and one is MUCH hotter than the other. This is often reported on the internet as well. Looking at he schematic, there is only one way for this to happen: the electret element is more or less sensitive in one or both (some have reported that the felt cover on their element had too much glue, but I did not experience that effect). And not by a little, but more like an 18 dB difference (this figure was measured by a sketchy apparatus of the author’s creation, but I’ll only entertain a handful of dB uncertainty, which still yields a significant difference).

The other is the wonky PTT behavior. The HM-151 doesn’t have this limitation. The keys behave exactly the same regardless of the PTT state (because the MCU in the microphone doesn’t ever see the PTT signal).

Lastly, the mass. The HM-133 is very light, only about 70g (minus the cord), this holds true for the HM-151 as well. So light, in fact, that it just *feels* wrong. By comparison, an HM-14 microphone head (less the cord) is about 90g. Still light but headed in the right direction.

I’ll handle these in reverse order. The mass is easy to fix, just add ballast. I’ve used lead sheet and sinker weights. Either way, I encase the ballast in epoxy (JB Weld is my personal favorite). For the three microphones I have modified, I have added an average of 100g of ballast to the back-shells. The main concern is making sure you leave clearance for the parts on the microphone PCB.

Next, the PTT. This one requires a careful choice. If you have a radio that uses the HM-133, modifying the PTT means that the microphone will not likely work on radios to which it would normally connect (there is a chance that the radio looks for a hard-wired PTT, but I can’t guarantee more than that). The modification is simple, cut the traces running to the PTT switch and run a jumper wire from one side of the switch to pin 4 of the microphone connector. The other side of the switch goes to GND. At this point, the HM-133 behaves like an HM-151. The only difference is that the modified switch lacks two buttons that are present on the HM-151. Or, rather, it lacks their logic. The DTMF-S and FUNC buttons still retain their HM-133 functions.

The electret element is the most difficult item to address. Since the source stimulus is sound, the only way to characterize a microphone element is to use some consistent source of sound. Such things are not difficult to contrive, but there are many subtleties that can easily escape one’s grasp. My Mark-II contrivance was used to reasonable effect. It is simply a closed, cardboard box with a small speaker suspended inside, and a small hole cut directly opposite the speaker. A function generator is used to drive the speaker with a 1 KHz tone, and a service monitor is used to read the resulting deviation that occurs when all of the relevant parts are brought together.

After several candidate elements, I settled on one that seemed to be reasonably close to the response I got with my HM-14 and HM-151. Of course, one could simply adjust the radio. For a one-off radio-to-mic application, there is nothing wrong with this approach. For a multi-radio suite, where microphones might move on occasion, such a solution is not as attractive. Ultimately, the choice is up to the user.

A final modification is to place an LED (I prefer blue, they are bright and contrast with the other colors used on the HM-133/151) inside the microphone to reflect the state of the adapter status. This is a more convenient location than having to look at the adapter but requires some fine-motor soldering skills to accomplish. Pin 2 of the microphone connector routes to the appropriate drive location on the adapter.

See "HM-133 Microphone Modifications" for photos and procedures for the various microphone modifications discussed herein.


La Fin...

As my ham projects tend to go, this one is an outlier...concept to complete in less than 2 months is quite a feat for me. The result is mostly favorable. There is a nagging problem whereby the key data bleeds into the microphone signal. There are only a few situations where this comes into play, and is seems to be happening in the HM-133/151 circuits (I have now confirmed that this issue exists on the IC-7000 with no DTMF adapter involved, so it is definitely an effect present in the microphone itself). I have made some effort to isolate the issue, but have had no luck. Other than this, the device seems to behave rather well and actually does what it is supposed to do.

The heat-shrink covering is a stopgap. It gets the job done, but a 3D-printed case would be "nicer". I have a 3D print model for one available on the HM133 DTMF Adapter Object Code page. It needs a tweek or two, but as modled, I have gotten one of them to work well enough. The main issue is that the nibs on the locking tabs need to be extended a "scosh" (maybe 20 - 50 mils, give or take). If I get time to circle back on that issue, I will update the github repo accordingly. The design is a clamshell, two identical pieces come together to make one cover. Excpect a lot of carving, sanding, and sealing by the time you are done. Here is a gander at my one attempt:

Not bad, but as I said, it needs some tweaks. A couple of small pieces of "squishy" silicone are recomended to keep the PCB from rattling inside the cover. Other materials may be used, but most generally break-down over the span of a few years and you are left with either a hard piece of shriveled stuff, or a crumbly mess. The primary shortcoming is that it is difficult to identify the radio or mic end of the dongle. The 3D model attempts to address this with "RIG" and "MIC" structures in the bottom face of the print. However, the printer I used filled these in with support, so the result is not as obvious as one would like. Still, it is observable. Better knowledge of the printer setup options might cure this, but that will vary from one printer to another.


Here is a listing of the various project documents that are directly relevant to the DTMF Adapter:

HM133 DTMF Adapter Source Code Page

HM133 DTMF Adapter Object Code

SiLabs Programming guide

HM133 DTMF Adapter Assembly and Operations Manual

HM133 DTMF Adapter -003 Schematic

HM133 DTMF Adapter Design -003 (Protel99 SE)

HM133 DTMF Adapter PCB -003 Gerber Files

HM-133/151 Microphone Modifications